Contents
Singling – Should I or Shouldn’t I?
Why a Volvo?
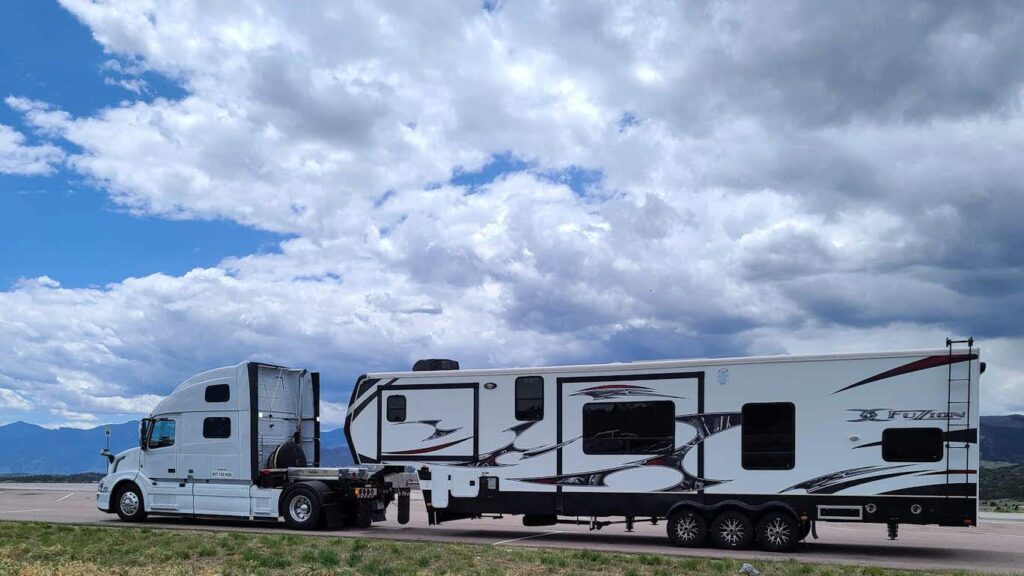
Using a Semi-truck as an RV Hauler
Dual Use Truck – Commercial and RV
Registering Your Truck in Texas
Truck Conversion Overview
Singling Your RV Hauler – Should You Single?
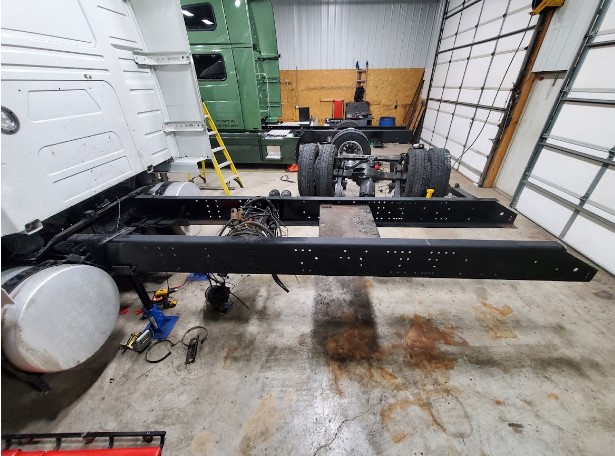
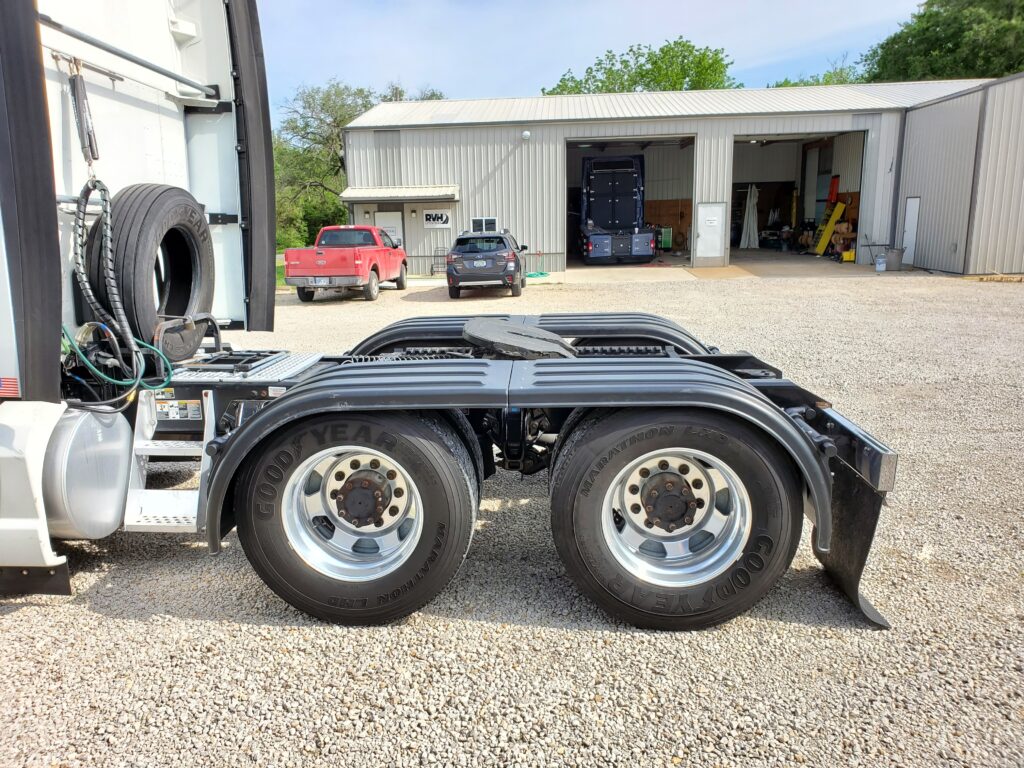
Commercial semi trucks that are acquired off the commercial market for use as a recreational hauler typically have tandem axles, e.g. two rear axles. For use as a recreational hauler the two axles are not necessary, since the trailer loads and pin weights tend to be much lighter than in commercial service.
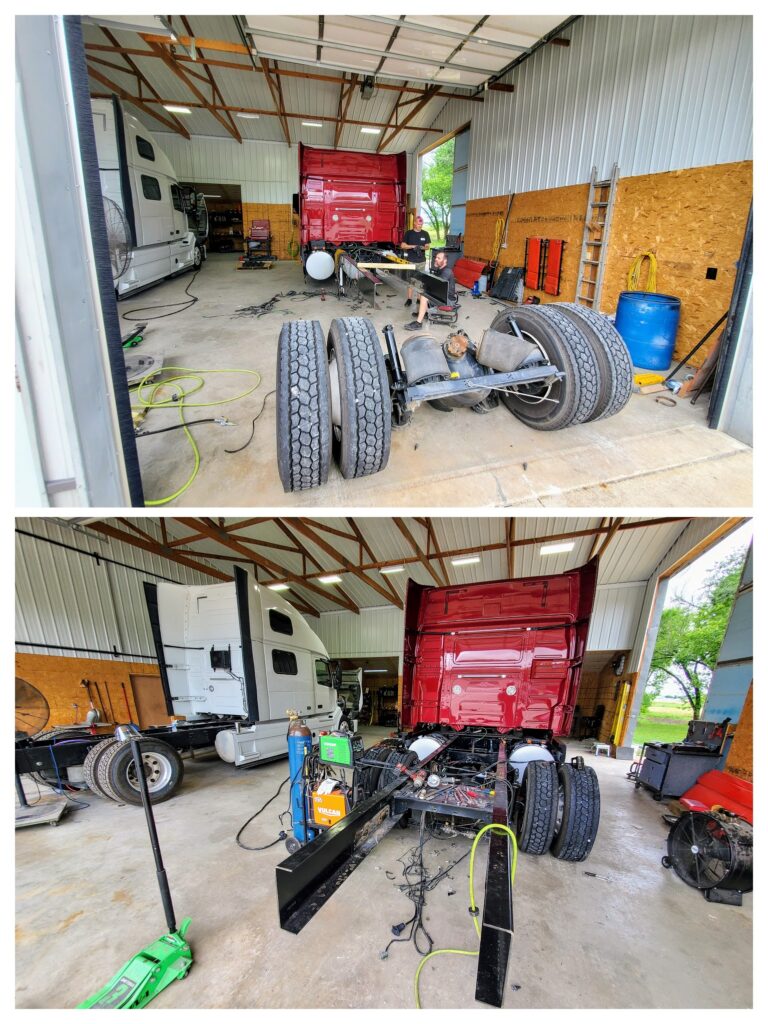
Singling the truck involves removing the forward-most rear axle and relocating the rearward one. While the remaining axle can be located anywhere on the frame to meet requirements, there are three positions commonly used to locate the axle. “Short” which is to place the axle in the forward position where the “removed” axle was. “Long” which is to leave the rearward axle in its original location. And “Mid”, which locates the axle someplace in between the two original locations.
Note that occasionally you will see someone discuss singling a truck by leaving the forward of the rear axles in place, removing the most rearward one, and running with the differential lock engaged. This is not a properly singled truck and this technique should NEVER be used.
Singling is not required for use in the recreational environment, and is one of the more controversial topics in the recreational HDT community. There are pros and cons to singling, like any other topic in the RV world. Everyone has an opinion, however many of the negative opinions are based on experience and data from the commercial world – and that does not always translate to the recreational environment, where loads are very light.

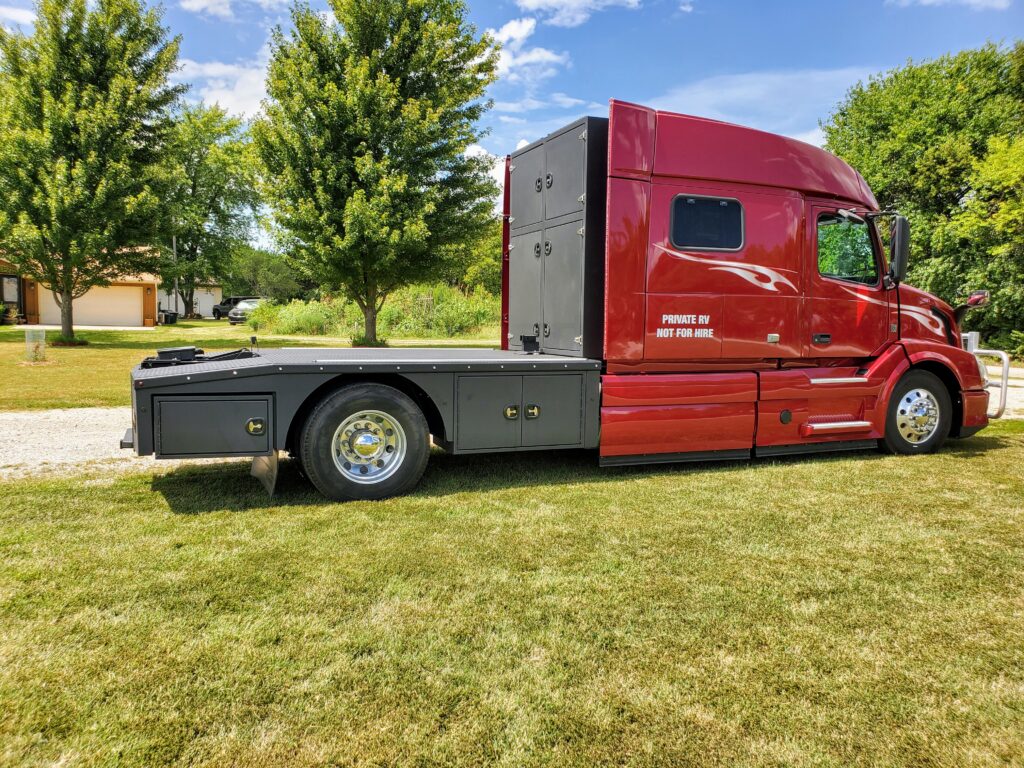
For our premium skirted bed, we always convert to single axle from tandem axles – that bed is designed around a single axle at 99″ from the back of the cab. On our sports utility beds, about 30% of the trucks stay tandem – mainly because this reduces initial costs. While this does decrease initial conversion costs, over time it will cost more leaving the truck tandem. This is simply another item you have to balance as you make decisions in your conversion process.
Singling adds significant cargo space to the bed, and simplifies ongoing maintenance quite a bit. It also improves maneuvering if done correctly. If carrying any deck cargo heavier than a smart car you have to calculate your weights carefully, since you would likely be pushing the carrying capacity of the rear (single) axle – which is usually rated in the 19,500 lb area. While you could find a 23K-rated rear axle for a singled truck, it is rare to do an axle swap. However, we can do that work if desired.
Generally, we recommend singling “mid” (middle, or near middle), since it balances the looks of most trucks better, and allows for a deck that can carry cargo without excessive cantilever of the hitch. This does require drilling new hanger holes, which the other options do not. So it adds to the work and cost (somewhat). But in the end, you get a better solution.
The exception to singling mid is if the mission profile requires a truck that is a “daily driver”, e.g. not designed to carry a car or other significant deck cargo requiring a large(r) deck. In that case, singling short is a better solution, since it significantly shortens the wheelbase and provides for a shorter overall vehicle and far better maneuvering capability. If you are driving the vehicle every day, this is a significant benefit.
A Volvo 730/780/860 singled short can have a wheelbase as short as 205”, and a 630/640 could be as short as 183”. This depends on several factors, including fuel tank size and position. A singled-mid Volvo 730/780/860 is typically a 236” wheelbase. When singling to carry a smart car, we position the axle at 99” BOC (back of cab) – which is the 236” wb of the 730/780/860.
We never recommend singling “long”. There is no advantage in doing so, other than ease of implementation, and there are significant disadvantages. Mainly, overloading the front axle with deck cargo, significant maneuvering issues vs. mid or short, and looks (the truck looks unbalanced).
Singling long may also result in a longer-overall truck since most suspension hitches used with HDTs require being set inside the frame rails. Singling long means having to extend the frame rails to locate the hitch; resulting in a longer overall vehicle than if the axle was more forward, to begin with.
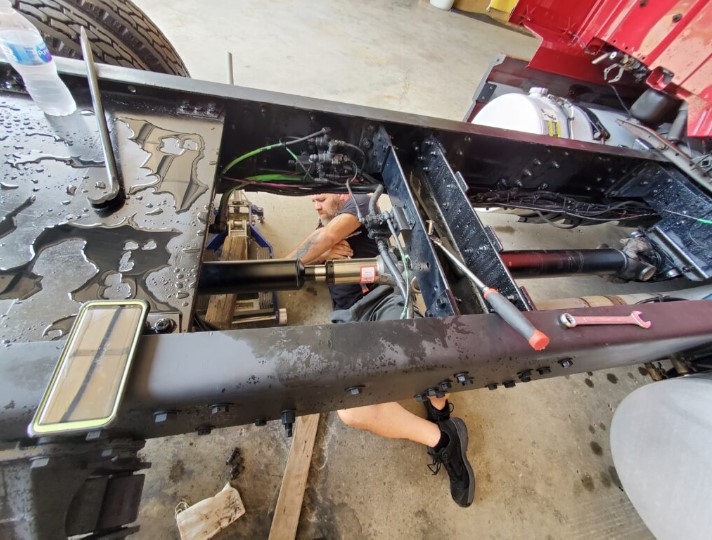
During the singling process, we clean the frame up and paint it (as required), service/replace brakes, suspension elements, torque arm, etc. Often airbags and brake cans are replaced. We also take the opportunity to fully service the cab suspension. This means replacing the airbags, the shocks, perhaps the cab leveling valve, control arm, bushing, and realigning the cab (most of them lean). The ABS brake system is reprogrammed to operate properly and to interface to the Volvo VEST system properly.
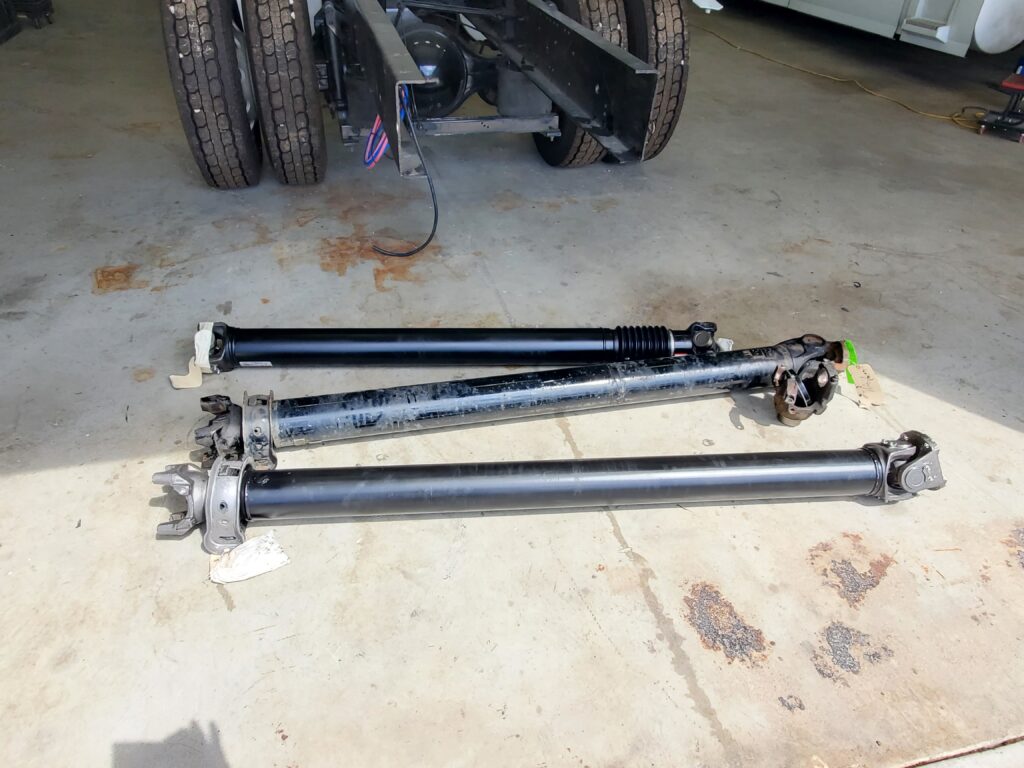
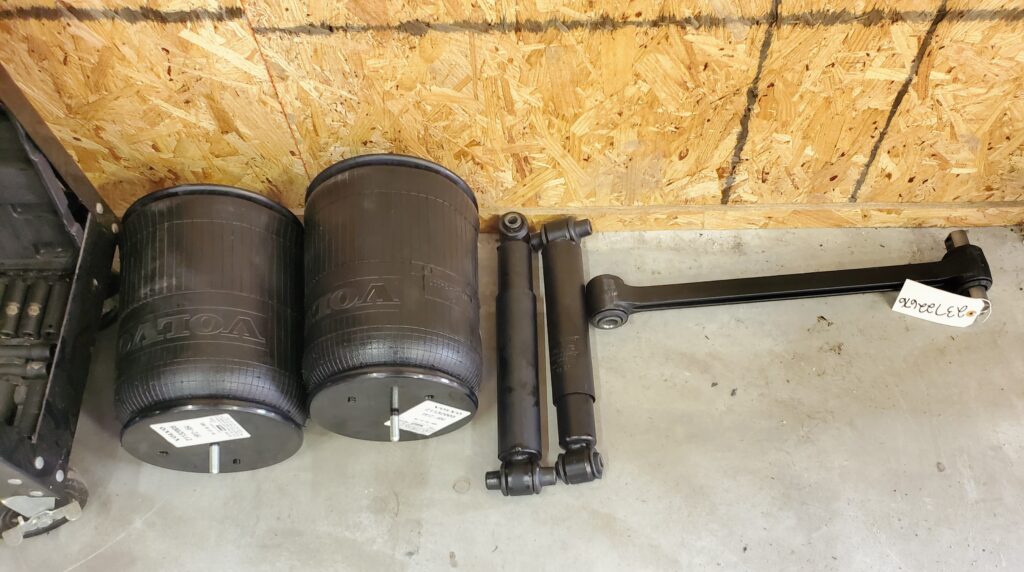
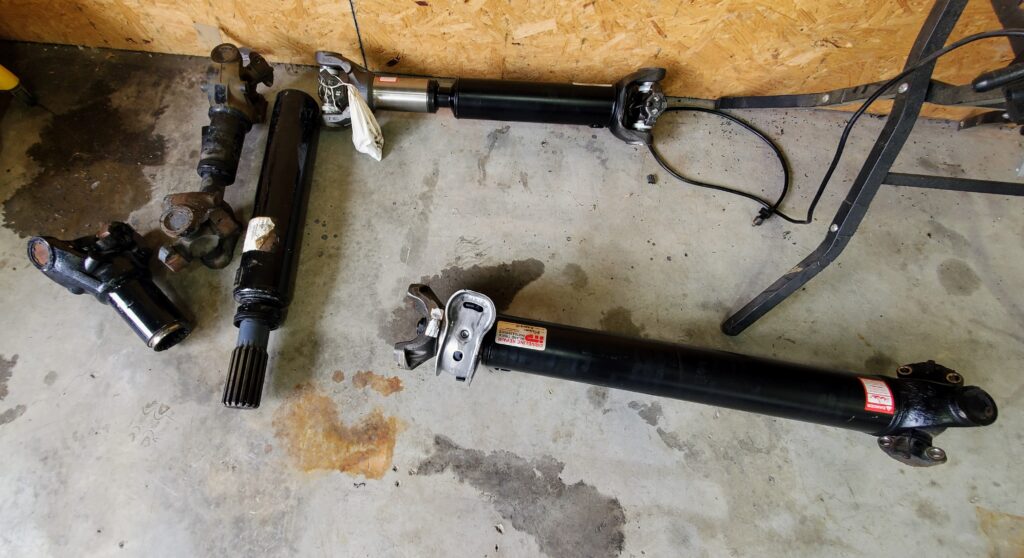
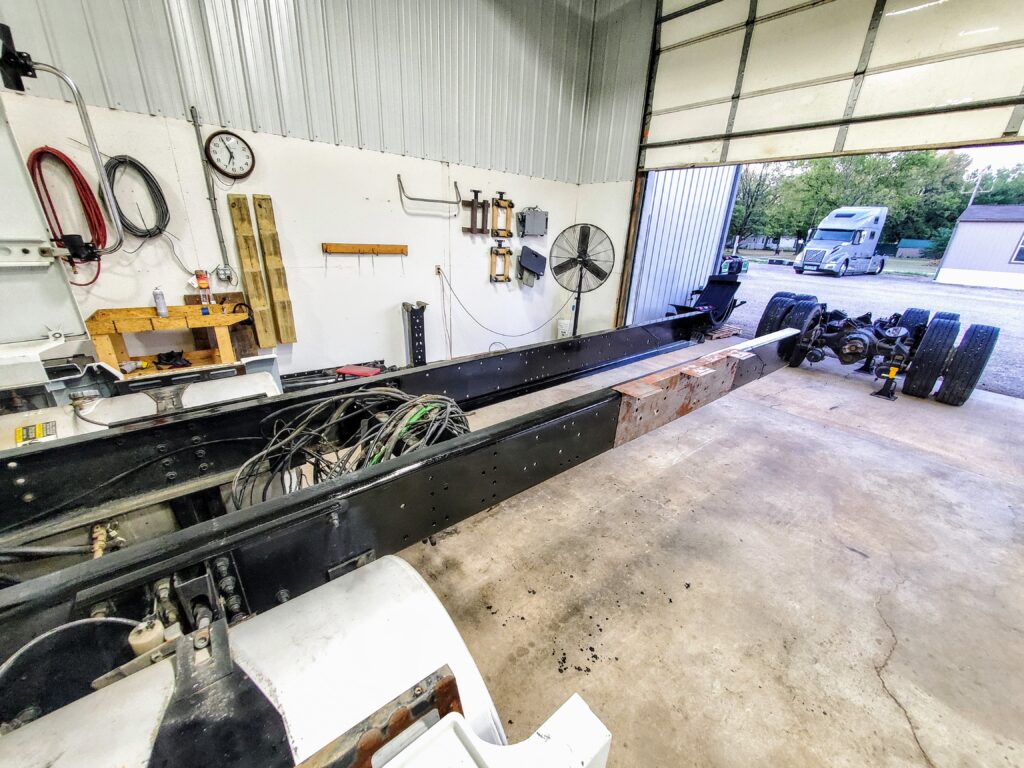
With the exception of the driveshaft build, we do all the singling work in-house (including the reprogramming). The driveshaft requires specialty tooling and access to parts – we leave that to the experts (we typically use Inland Truck Parts and Service who have locations throughout the central United States).
Cost
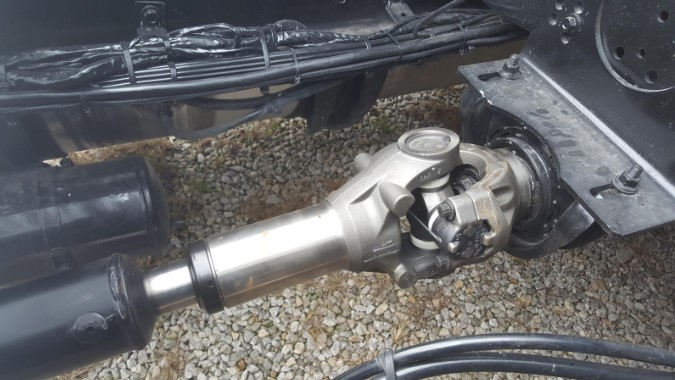
There is a great deal of discussion about the value of singling in the HDT community. While you do not have to single a truck, it does have some advantages, and of course some disadvantages. The main disadvantage is the initial cost. Singling, along with the corresponding repairs/improvements discussed above typically averages in the $7,000-$12,000 range. However, some of that is actually repairs and improvements, not “just” singling. In most cases singling a Volvo to the wheelbases we use requires a two-piece driveshaft and adding a carrier bearing and bracket. This adds cost to the process. We only use the highest quality parts (U Joints, yokes etc.), so undertaking singling does add to the overall project cost.
So what does it cost for just the singling process (not repairs)? In general it is about evenly split between labor and material. The materials vary a little depending on yokes and other components, but a two-piece drive shaft, balanced with proper yokes, new U joints and a new carrier bearing assembly is going to cost in the $3500-$3800 area (retail pricing, you might get a discount). It can vary a little – $500 in either direction is probably average. Wholesale costs are lower, of course. Then add 25-30 hours of labor to the materials. In the end, you are going to be in the $6,000 and up range for most jobs if they are done right. Maybe a little less in some markets, but it is not going to vary a lot. If you get wholesale pricing on parts you can reduce the materials cost to around $2800-$3000 in many cases. Prices vary over time, but you get the picture.
Anyone that tells you they got their truck singled (by a shop) for $1500-$2000 is not giving you the entire picture.
Sometimes you hear people say that “you can trade the removed axle for the work”. We have heard that for many years. I’ve been hearing it for at least twenty years. However I’ve never found anyone that actually did that in a commercial shop (a shop that was not owned by their buddy or family). Yes, you can trade tires and wheels in for credit – and we also give credit for usable tires/wheels. But a straight trade for the forward axle, tires and wheels for all the work simply does not make financial sense – the numbers do not add up. Perhaps in a high volume frame shop you might get some additional consideration for the forward axle, but getting a 100% trade is something that would be very rare – at least in our opinion.
Pro’s and Con’s of Singling
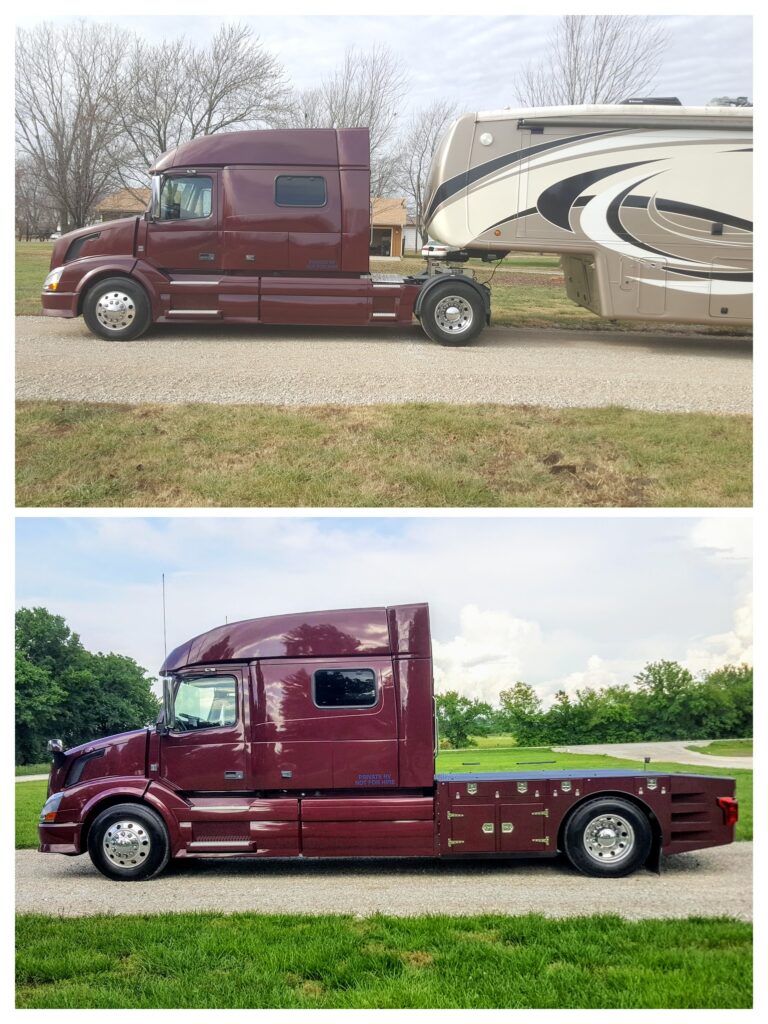
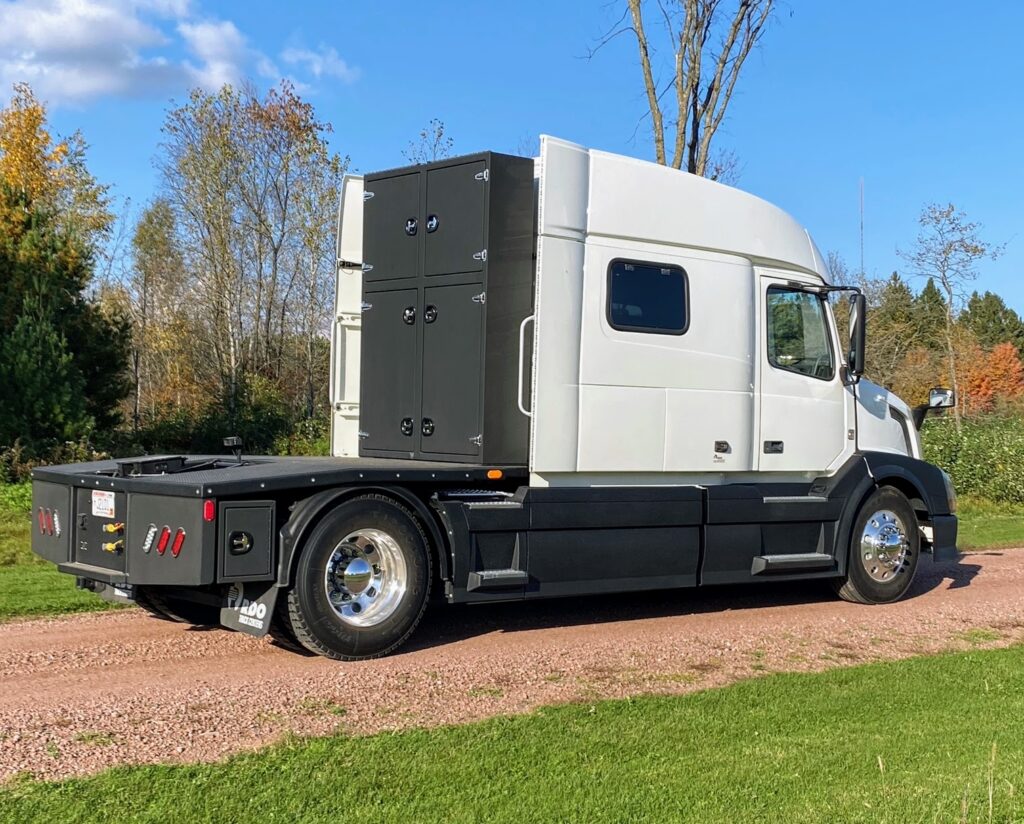
The two biggest “pro’s” of a singled truck are, 1) the massive amount of available storage and, 2) minimization of ongoing maintenance costs. Tandem trucks have little available rail space for storage boxes. There is a huge storage difference between the tandem truck and any version of the singled truck. This is the largest benefit of singling – from a practical perspective. The pictures above really show the difference.
While you hear about singled trucks turning better and getting better fuel mileage, these benefits – while true – are not as significant as the storage and maintenance benefits.
One of the things you often hear about singled trucks is that they do not ride as well as tandem trucks. While this may be true in a specific set of circumstances – like going over speed bumps, where the rear is always supported by the tandems – we do not find it to be generally true in RV use.
Consider the design goals of the original truck – it is designed to carry significant weight on the rear axles – upwards of 35,000 lbs. And it has a suspension designed for that purpose. So even though it has air ride, it is still pretty “stiff” in the rear when tandem. We have driven the same roads with the same model truck that were both tandem and single and frankly don’t find much difference in them when in RV use or bobtail. If anything, the singled truck rode better. This would not be applicable to commercial operation with different loading factors.
Another point you hear is that a tandem truck has better traction. This is simply not true in the recreational world – and when I say not true, I mean definitely not true. The main point used to support the argument that tandems have better traction is that the inter-axle lock allows for a front-axle wheel position to be driven, along with the back. While this is true, it does not really gain you much, if anything, in recreational use. The issue with traction in tandems is that the tires are “floating” on the surface. They simply do not have enough weight on them for good traction with the loads we carry. A single axle truck in recreational use will almost always out perform a tandem axle truck in the same set of circumstances – there is simply more pounds per square inch on the road surface. That results in better traction.
If you don’t believe this, ask yourself why the truck manufacturers build lift axles on modern trucks (like Volvo Adaptive Loading). Part of the reason is economy, but all of the manufacturers and drivers of these vehicles say there is far better traction in slippery conditions with the axle up.
Cost of singling is mitigated a fair amount if you have to replace tires during conversion – and most conversions do end up with tire replacement. Why? Because trucks coming off of commercial service have recapped tires on the rear axles 90% of the time (if not more). With a tire costing in the $600+ range, replacing four extra tires on a tandem configuration is $2400 right off the start. Extra air bags, brakes, etc will almost certainly add to that initial set of costs. So singling does not affect the overall cost as much as you might first think.
Why a Volvo?
When selecting an HDT for recreational use there are many manufacturers to choose from. How do you decide which truck brand to choose?
In many cases it is simply a personal preference, based on past experience, looks, or brand loyalty. That is a valid selection method, since clearly any of the HDTs can pull any recreational trailer.
You do see a lot of Volvo’s in recreational use – and it is the brand preferred by RVH Lifestyles. However, we will find and convert any brand truck, or work on any brand that you bring us. For most people we lean towards the Volvo for a variety of reasons.
Transmission
Volvo has the best automated transmission of all HDTs. The IShift is a remarkable transmission and is smooth and reliable. It really is best-in-class. All the other brands offer automated transmissions as well, and they all work – but the IShift is the class leader. It has a five year/750,000 mile warranty, so they stand behind it.
Engine
The D13 is a very fuel efficient and reliable engine. The emissions system paired with it has a reasonable repair/reliability history. Note that all emissions systems in heavy trucks are subject to issues, but the Volvo one is pretty good. The engine builds peak torque at 900 rpm and if configured correctly can cruise at 1150 rpm at 67 mph. This makes for a quiet ride, with full power availability. From a reliability perspective the D13 engine has a B50 of 1.2 million miles in the newer engines (older B50 figures have not been published) – this means that half the engines need rebuild before 1.2 million miles, and half after 1.2 million miles. A remarkable figure.
Cabin
The cabin is full width so you have more storage space and more room for moving between the seats. The storage space in the Volvo is very good. The sound deadening is pretty good – it is either the quietest cab within the same model year trucks, or near the quietest. There is some debate on that. Our decibel measurements show it to be the quietest that we have measured. We generally see 68-70 db at highway speed on most roads and with new trucks on excellent roads we see 65 db. Of course it can vary some based on road conditions. The aerodynamic characteristics of the cab contribute to this as well. There is limited noise coming from the mirror arms and the windshield area is very quiet.
The “workstation” – actually a dinette in RV terms – in the larger Volvo condos is very well suited to RV use. The wider cab makes this a very comfortable seating area. Most other brands do not offer this, although some of the newer Cascadias do.
The aero cab is one piece with no external rivets showing, which cleans up the look of the cab.
The tank skirting folds outward on most of the trucks and is easily removable for service or routine access.
Suspension
Volvo is known to be a good riding truck. It is simply a smooth truck to drive. If the optional front airbags are on the truck it is even better. However, many people find the front airbags to be too “mushy” of a feel. Most Volvo’s do not have them. We feel that the later versions of the Volvo are the best riding trucks available.
Maneuvering
The 50* wheel cut and set-back front axle results in a very good turning radius. In combination with the RV hitch set behind the rear axle, the Volvo can back an RV trailer into sites that a pickup cannot get a trailer into.
Safety
Volvo is known for its safety features. There is a standard drivers side air bag – no other brand offers this as a standard feature. The engine and transmission are designed to be pushed under the cab in a front end collision, and the steering wheel collapses like in a car. The cabin area where the driver and passenger sit is reinforced so that it does not collapse around the occupants, and the doors are designed to be opened after a collision.
The sloped hood gives greater visibility than many other trucks (but not all), and the sloped dash allows even shorter people to have good views of the road and things close to the truck.
There is a standard forward collision warning system and mitigation for emergency braking. The VEST (Volvo Enhanced Stability Technology) system detects rollover, jack knife and loss of control situations and mitigates them by reducing engine torque and applying braking. The VADA (Volvo Active Driver Assist) system warns of objects in the road and provides braking assistance if the driver does not react.
Using a Semi-truck as an RV Hauler
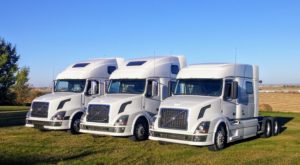
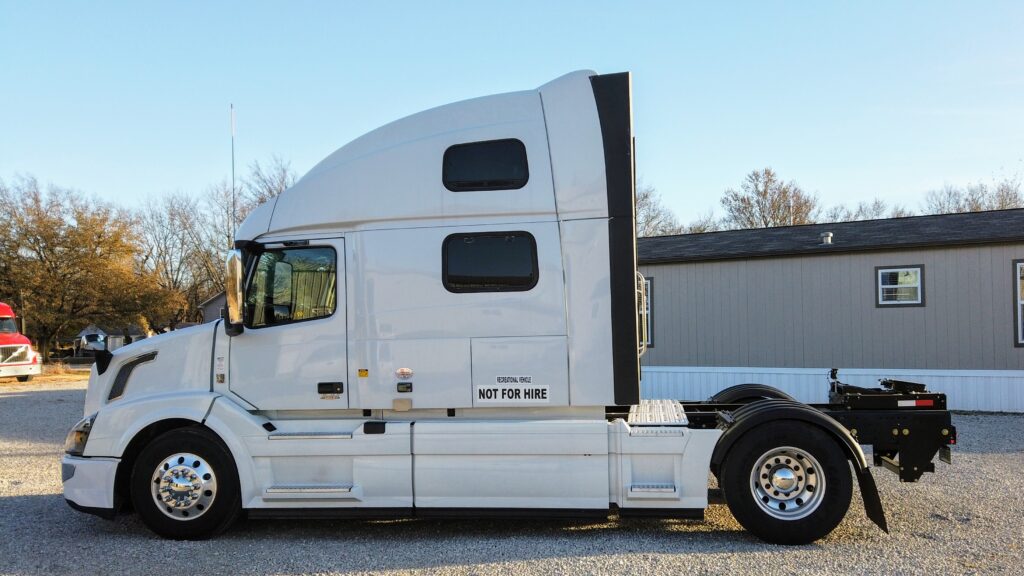
Shown here are the three common models of Volvo’s that are converted to RV Haulers. The leftmost truck is a Volvo 780. In the middle is a Volvo 670, and on the far right is a Volvo 730. Not shown is a 630 – which is the same height as the 730, but has the shorter condo of the 670. The 630 and 670 are the same cab, except the 670 is full-height. That gives you more interior storage. The 780 and the 730 have a wider cab, deeper (longer) condo. The 780 has the most storage and most “livability” of the three.
The 670 has two bunks in it, as does the 780. The 670 is the most common Volvo and is widely used by long-haul fleets. The 780 is mostly an owner/operator truck, and the 630 is mostly a regional hauler truck. You see the 630 pulling tankers and flatbeds.
The 730 is the rarest of the four trucks.
But It Is So Big!!!
Some people are intimidated by the size of a semi-truck (HDT, or Heavy Duty Truck). Our Volvo 610 (the white truck on the left in the above photo) was a short wheelbase conversion, measuring 182 inches. The wheelbase is just a little over what a crew cab dually pickup truck wheelbase is (6” more), and the total truck is just a few feet longer. With the fifty degree Volvo wheel-cut (how far you can turn the wheels) you can maneuver far better than any pickup. And, although the truck is taller than a pickup, the 10’ 10” is still low enough to drive around town and into neighborhoods. You do have to be aware of low tree limbs, and you will not be going through most drive-thru’s, but it proves not to be much of an issue.

The bottom line is that the “footprint” of that truck on the road is about the same as a crew cab dually, and it maneuvers better. Yes, it is a little taller. But it is the same width as the crew cab rear wheels, and easier from a driving perspective because the front is the same width as the rear – unlike the pickup, where the rear is wider. On the pickup, you don’t visually “see” that extra width out in front of you, so it is harder to adapt to.
In the case of our 780 – the larger silver truck shown with the car on it – it is definitely larger than a pickup at 29’ 3” overall length. But it has a condo you can live in and a car on the deck. Because we carry a car on the 780 the truck itself is not a daily driver, so the additional size of the truck is not really a factor in livability.
Visibility to the rear is also a concern we hear from people. It is true that you do not have windows to look out of to the rear. But the mirrors are so big that this mostly negates the issue. And the fender mirror(s) allows you to easily see the blind spots. The driving position is high enough that even if you had windows, they would not provide good “situational awareness” so your driving must adapt to that – just like in a motorhome. You use the mirrors, and you use the side and backup cameras. There is a monitor for viewing those right next to the driver’s seat.
The HDT gives you a much better view down the road since your seating position is up higher. It is far more comfortable than a pickup pulling an equivalent size trailer since it has all air ride; air ride suspension, hitch, cab and air ride seats. There is no “chucking” with the truck either since it is heavy enough to resist that. And, of course, the engine brake means that you never have to worry about going down hills. With the in-built engine braking, you can go down any mountain without ever touching the service brakes.
How Does the Transmission Work?
Our 1999 Volvo 610 had an “Autoshift” transmission. The autoshift transmission requires that you clutch only on starting or stopping. After that, the computer performs all shifting, both up and down – there is no “clutching” required for gear changes. There is a manual mode where you may use push buttons on the transmission stalk to perform shifts – again, with no use of the clutch. The truck will not allow you to perform a shift where you can over-rev or lug the engine. This means the engine is always protected from the driver. One advantage to having a clutch for starting is that when you are hooking to the trailer you can “slip” the clutch, just like on a car, and control your speed better. Earlier truck transmissions without a clutch pedal often have issues with this low-speed backing – especially Freedomline and Ultrashift transmissions.
The newer-generation transmissions that are fully automated properly handle low speed creeping. The Volvo I-Shift that is available in later model Volvo’s (2008 and newer); the Ultrashift Plus also performs quite well, as do the other newer transmissions.
What Kind of License Do I Need?
I get the license question fairly often. Depending on your state you may need an upgraded license or you may be able to drive on a “car” license. You will have to investigate that issue, based on your domicile. But if you need an upgraded license for an HDT, you will almost certainly need an upgraded license for the “super pickup” class vehicle as well – like the F450/550 and the Dodge 5500. Most states that require an upgraded license do so at a weight limit. I’ll use Texas as an example. In Texas if the combination of the truck GVWR (note that is the rating, not the actual weight) plus the trailer GVWR is over 26,000 lbs you need an upgraded license – in the case of a truck/trailer you need a Class A Exempt (“exempt”, meaning exempt from CDL regulations). An F450 has a GVWR of between 13,050-14,000 lbs, depending on year and equipment. That leaves you around 13,000 lbs for the trailer before you get into Class A Exempt licensing requirements. Each state will vary somewhat, but more and more states are implementing weight-based licensing requirements. If interested in hearing more about this contact me.
What About Comfort?
People ask about comfort because their current pickups hauling big trailers are so uncomfortable. That is because they are being pushed to their limits and are not designed for comfortable hauling of large loads, even though they may be rated to safely handle the load.
A semi-truck is designed for an 80,000lb (combined) load to be pulled continuously across the country. The cabs are designed for driver comfort – since drivers essentially live in the truck 24/7 while on the road. The truck has creature comforts just like a car does – good climate control, sophisticated cruise control, and an excellent driving position with full adjustment of the steering wheel. It also has a seat that is more like a chair; positioning is more chair-like as far as your legs go, instead of “laying you out” with your legs extended like many cars do. It has an air ride cab, air ride seats, air ride suspension, and an air ride hitch so that trailer movement does not translate to truck movement.
How Does One Choose a “Good” Semi-truck?
Choosing a semi-truck is a little different than choosing a car. But in some ways it is the same….let me explain. The difference is that you generally focus more on miles than on the year. And the number of miles on a semi-truck may seem daunting to most car buyers. That goes back to how semi-trucks are expected to perform. Remember, these trucks are designed to be driven 24/7. If the truck is not moving it is not “working”, and thus is not making money for the company or the driver (most drivers are paid by the mile). A semi-truck that is “team driven” can easily rack up 10,000+ miles a month. The truck and engines are designed for high miles, unlike a car that may only average 20,000 miles a year. In general, the engines in these trucks are designed to go 1,000,000 miles before overhaul. Yes, that is one million.
Maintenance is the key element in finding a good truck. The truck needs to be properly maintained by the driver/company. Buying a truck with a known “provenance” or “pedigree” goes a long way to ensuring that you are getting a good truck. Anything can happen of course, but we maintain our trucks to the highest standards. We generally replace components far before needed. We do not want to break down on the side of the road or be stuck someplace. Since we live “on the road” that is not an option for us. We owned the 1999 Volvo 610 shown above for ten years and it was very reliable. We never broke down in it.
Where Do I Get It Fixed?
Most people never notice all the HDT (heavy duty truck) service facilities. There are places to service/repair these trucks in every town in the country. There are lots of HDT “working” trucks traveling the highways continuously, and they have to get fixed wherever they are. So it is easy to find service for the truck – far easier than for a pickup truck. And, in general, the shop rate for HDTs is lower than for pickup trucks.
What Does It Cost to Rebuild The Engine?
Some people have heard horror stories about HDT’s needing to have the engine rebuilt. While this is VERY rare in RV use, it does happen, and no one can guarantee that it will not happen to a particular truck. But don’t forget, these trucks mostly have engines designed to go one million miles without rebuilding – and many go far beyond that.
Dealing with a “blown” engine takes, basically, three forms depending on the damage.
Typically you can do an “in-frame” rebuild, where the engine remains in the truck and is rebuilt in place. The second choice it to pull the engine from the truck and rebuild it. And lastly, you can get a re-manufactured engine that has been rebuilt by the manufacturer and comes in a crate – called a “crate engine”.
On a Cummins ISM like in our Volvo 610 an “in-frame” rebuild runs around $11K-13K, depending on what is done. Cummins Rocky Mountain was advertising an ISM in-frame rebuild for $10,800 in June 2013. It would not be much more today. It is typical to replace functioning auxiliary components during the rebuild process, simply because you are “in there”, which will add to the price. At the end of the rebuild you typically have an engine with a 2 year/200,000 mile warranty. From an RV-use perspective, it is a “lifetime” engine.
Our Volvo 780 had a D16 Volvo engine in it. This is a much larger engine than the ISM, and would cost in the $20,000+ range to rebuild.
RVH Lifestyles sells two or four-year warranties that cover all the major engine parts, in addition to the transmission, pollution control systems, differential, turbo, etc. Any truck purchased from RVH will come with at least a two-year warranty, but you can place a warranty on your own truck.
The Bottom Line
An HDT is easy for almost anyone to drive. I have taught many women who have never driven a large vehicle to drive at the HDT Rallies. People adapt very quickly. And the HDT gives you the flexibility to do many things not possible with a pickup: never any concerns about weight again; plenty of power for the mountains; exceptional braking power; use as a motorhome for short trips; carrying a car, motorcycle or ATV; lots of storage, etc.
Here is a video with further information about tow vehicles.
Dual Use Truck – Commercial and RV
Some commercial operators want to use their heavy duty truck (tractor) for commercial use, and then occasionally pull an RV with it. This is possible to do without changing the commercial hitch, if done correctly. You need to accomplish the following:
- Provide a way to convert the commercial lighting to RV lighting – the commercial tractor has separate turn and brake signals, while the RV combines them together.
- Provide for physically hooking the RV to the truck. The kingpin on an RV will engage properly on a commercial plate, but there are other considerations.
- Effectively operate the brakes on the RV. The commercial truck does not have provision for electric brakes – only for air brake systems.
- Protect the RV from damage. The commercial truck will throw road debris on the trailer, and it may also cause damage because of the ridged ride.
Let’s discuss the alternative solutions to these problems.
Lighting
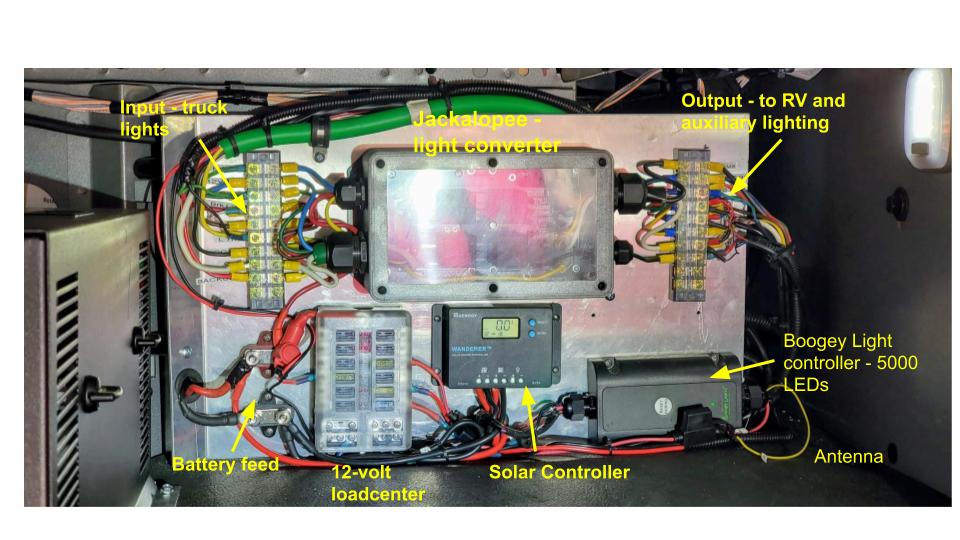
The lighting issue is relatively straightforward. You need to convert the lighting from commercial to RV use, since the commercial vehicle uses a three light output and the RV uses a two light output. On commercial vehicles the brake signal is separated from the turn signals, while on RVs it is combined. There is no simple “adaptor” that you can just plug in to do this. The best way is to use a light converter like the Jackalopee, or other comparable converters. We prefer to use the Jackalope since it has proven to be the most reliable solution.
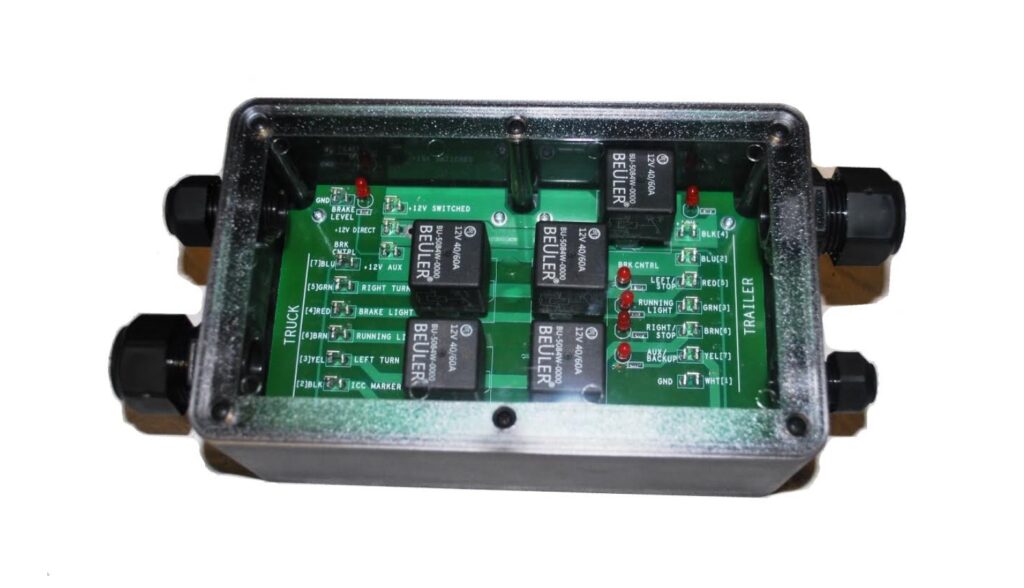
You can tap into the lights at the rear of the truck to gain the combined turn/brake function, but it is not recommended. The best way to do it and still maintain commercial operation is to build an adapter setup using a commercial socket that directly connects as the input to the jackalope, and simply plug your commercial trailer pigtail into that socket. The signals go from there directly into the Jackalopee where they are transformed to the proper RV signals.
Fortunately, the Jackalope is available with just such an adaptor setup as an option. It contains the required commercial socket for input to the Jackalopee, and the cable required. And better yet, it comes with very good instructions. All that said, if you are not familiar with 12 volt wiring or are not confident in your skill level then it may be best to have this part done. Proper wiring techniques are crucial to long-term reliability.
Once the wiring is completed, to convert to RV use you simply plug your green commercial pigtail into the new commercial-style socket. This will feed the truck’s commercial trailer signal through the Jackalopee where it is converted to the RV signal, and pushed out through the new RV cable to the RV socket secured somewhere on your frame rail near your hitch.
Physically Connecting the Trailer to the Truck
An RV kingpin is the same as a commercial trailer kingpin, so you can physically connect it to the commercial hitch. But there are some considerations.
First, you have to have the physical space to jacknife the RV trailer without hitting your truck – mainly the mudflap hangers or the side rails. If your commercial hitch cannot be slid far enough rearward for clearance then you will have to correct that. The easiest way is to extend the track on your slider. We routinely do this, and done correctly it is not a big deal.
An alternative is to use a trailer pin box that extends the kingpin forward, for better clearance. We do not recommend this if it is an extreme extension, since it puts more stress on the trailer frame. You may not have a clearance issue in your particular set of circumstances, so measure carefully.
Second, be aware that there is no side-to-side motion on a commercial hitch and that can affect both the hook/unhook process on an RV, as well as put stress on the trailer frame when traversing uneven terrain.
RV Brakes
You need a method of actuating the RV brakes. Almost all RV brakes are electrically operated at some level, e.g. electric-only drum brakes, or electric over hydraulic disc brakes. You need to install a brake controller in your truck that will convert your truck air braking over to an electrical signal.
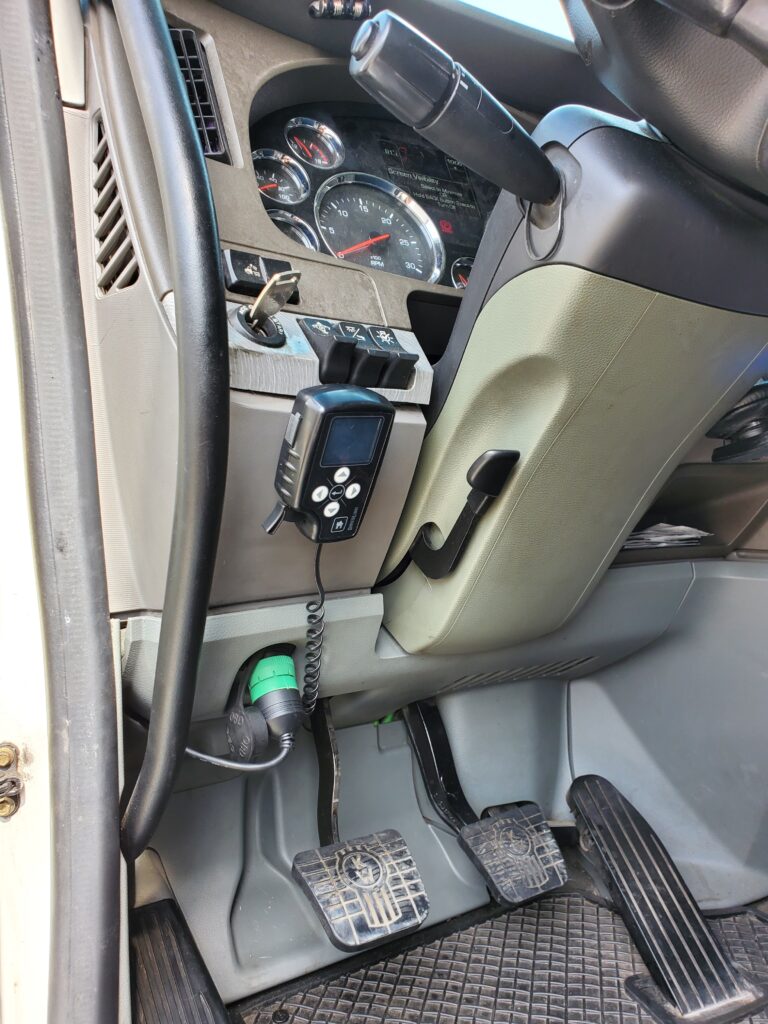
Conventional pickup truck brake controllers do not work reliably or effectively when used with semi trucks. We recommend only two controllers: the DirecLink and the Hayes. The DirecLink attaches to the OBD port and uses a truck-brand-specific adaptor to generate the electrical brake signal for the RV. The Hayes uses an air actuated component to do the same thing. Both are effective and work well. We prefer DirecLink.
Note that using a Direclink that plugs into the OBD port means that you need a Y splitter for that port if you use an ELog at the same time as the RV. Make sure that your ELog software is compatible with the Direclink. Tuson, the Direclink manufacturer, can tell you that. In most cases you will not be logging your time when using the RV, so it is typically not a factor.
Protecting the RV
Without a bed on the truck you need to protect the RV from road debris thrown up by the tires. That means fenders on the truck. These are required, or you will destroy the underside of your RV pretty fast.
Fenders can be problematic since you are trying to service two competing needs – protecting the RV and still having the ability to drop your suspension air to ease the commercial trailer hookup process.
To be able to fully drop the air, you need about four inches of fender clearance over the tires on many brands of tractors. But when you do that, you may find that those fenders are interfering with the commercial trailer when aired up. There is a fine line to walk, depending on the particulars of your tractor. We find it is best to mount the fenders as low over the tires (with air dropped) as possible – almost to the point of rubbing. We typically do a half inch – which is not what most fender manufacturers specify. Experiment with your particular situation to get the optimal setup.
The other issue is the commercial hitch itself. As mentioned previously, they don’t typically have side-to-side flex. But more importantly, they do not provide any “cushion” like an RV suspension hitch does.
The semi truck suspension is designed for heavy loads. Even when unloaded the air bags give a pretty stiff ride to the RV. That can affect the frame. There have been many, many trailers damaged by towing with an HDT with the commercial hitch instead of an RV suspension hitch. In addition to the lack of suspension, the harmonics being sent through the commercial suspension to the RV frame can also cause damage.
Some people have pulled with the commercial hitch for many miles without damage. And some people have rolled the dice and lost badly. Frame damage will be very expensive to repair. We do not recommend routinely pulling with the commercial hitch without some form of cushioning to the RV.
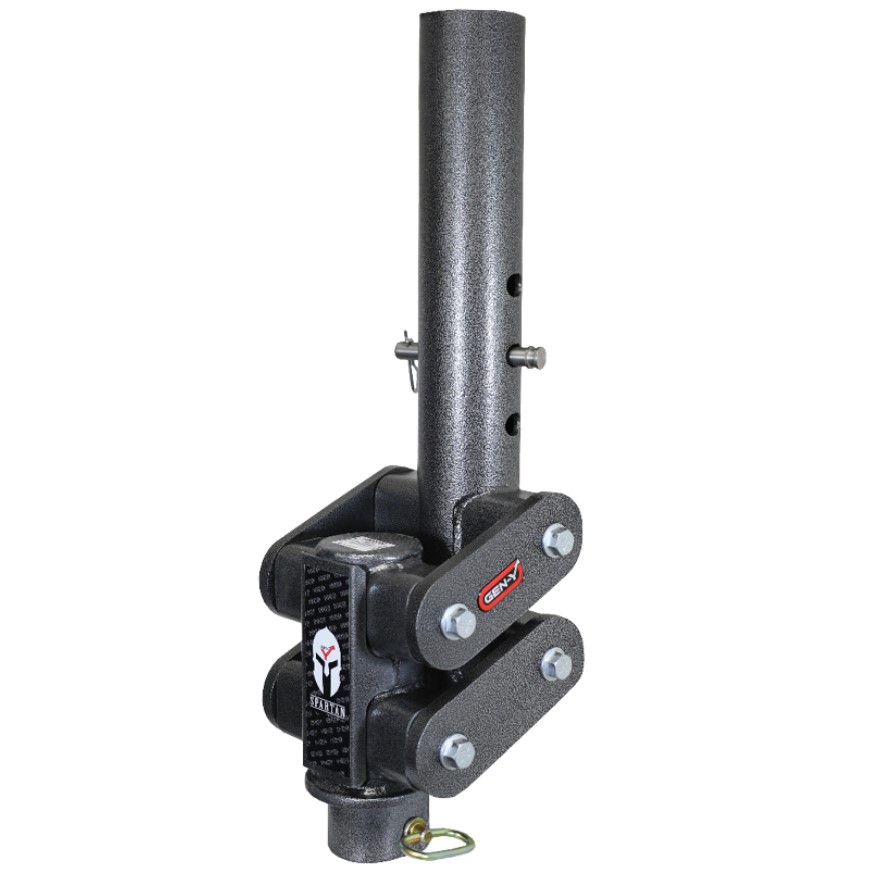
So how do you cushion things without replacing the commercial hitch? Typically with a replacement pin box on the RV that has some suspension elements to it. Look at the GenY pin box and the TrailAir as examples. There are others available as well.
Note that just replacing the pin box with a suspension kingpin does not solve the side-to-side motion issue.

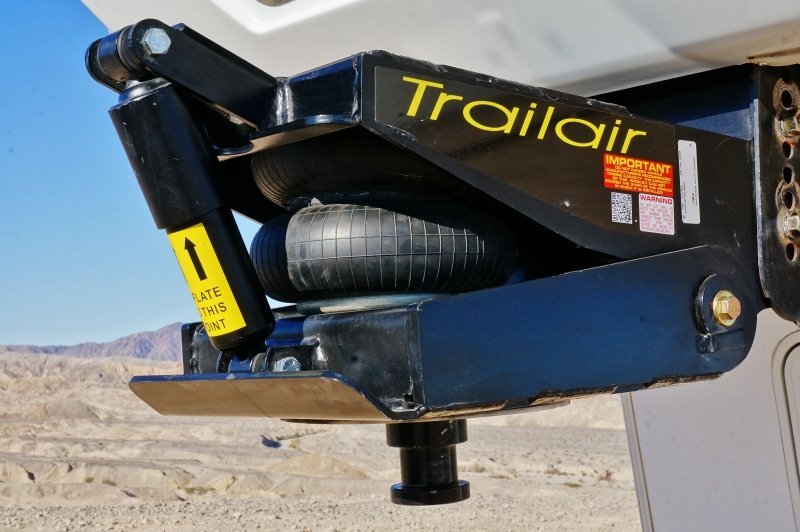
Whenever replacing the pin box you have to make sure of a few things. First, make sure you use new hardware – it is best not to re-use the existing bolts. And do not eliminate bolt hole positions – you need as many bolts in the new pin box as the old one had. Second, make sure that you order a pin box that has the same bolt pattern as your existing pin box, or you may be surprised to find that the new one does not fit. Also, make sure that the new pin box positions the pin at least where the old one does, relative to the RV. It can be more forward (within reason) but if it is more rearward your RV may not clear the truck like it once did.
Alternative Solutions
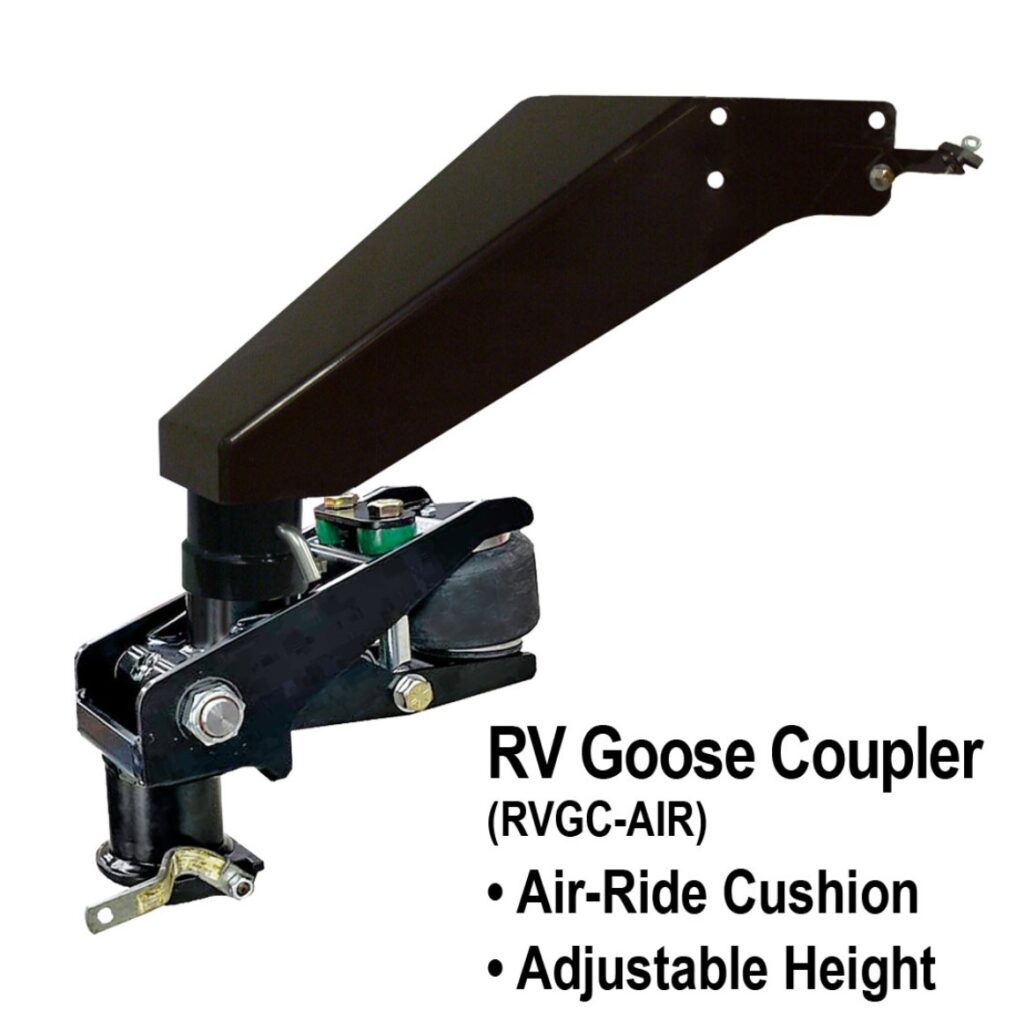
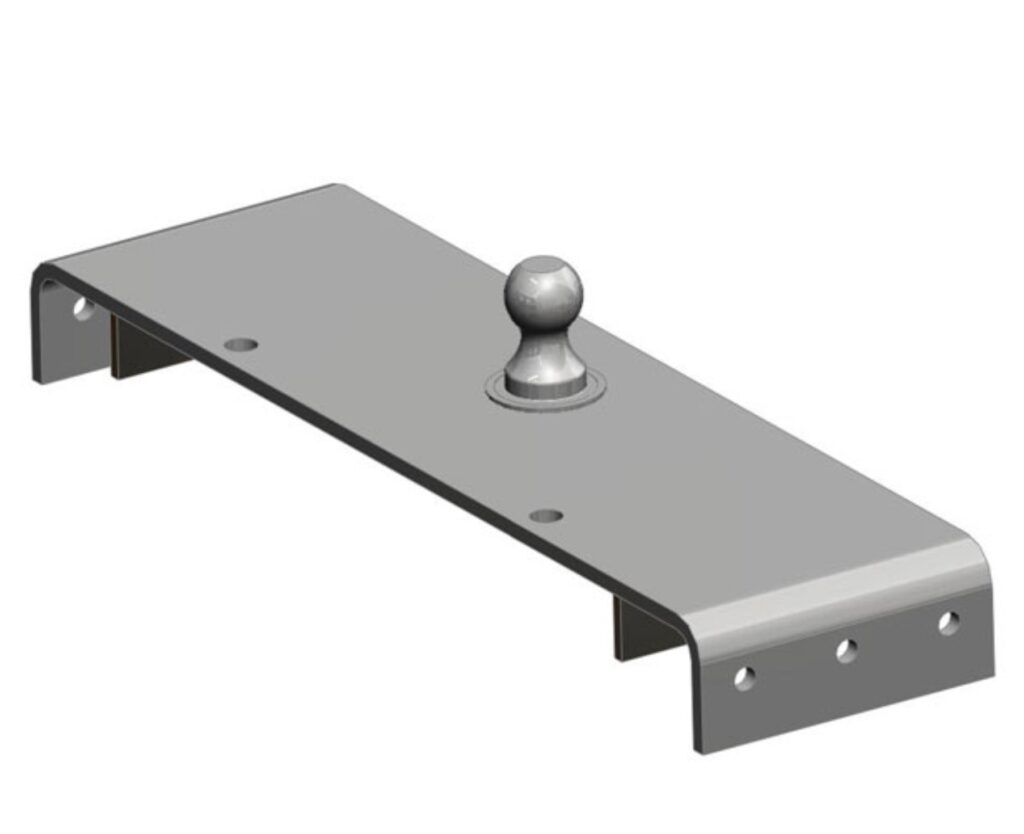
Ideally you want side-to-side motion at the hitch, as well as cushioning for your RV. One way to do this is to not use the commercial hitch at all but to use a combination of a ball hitch and a suspension pin box. One of the best for this is the PopUp RVGC-Air or the GenY gooseneck pin box in conjunction with the PopUp products semi truck frame rail mount, turnover ball. The ball allows for side motion, the pin box provides cushioning, and the turnover ball does not interfere with commercial operation when the RV is not in use.
This solution also solves any issue you might have in getting the commercial hitch far enough rearward to not interfere with the RV turning.
Getting your RV Hauler Registered in Texas
By Jack Mayer
Texas is one of the states that allows HDT’s to be converted to motorhomes, with a resulting motorhome (MH) title. The benefits of this are:
- might lower your insurance costs
- makes for a compelling case for bypassing scales in most states
- exempts you from the 20,000 lb bridge axle weight (it is 23,000 for motorhomes)
- exempts you from an air brake endorsement in Texas
So for most people it is an attractive option.
If you are already domiciled in Texas it is pretty simple to do the registration either in person or by mail. To file by mail you have to be “out of state”, although no proof of that is required.
I’ve done a number of these registrations by mail in Polk County (home of the Escapees RV Club). This info is from my experience in that county. Polk County is a non-pollution test county. In pollution test counties the procedures may vary slightly.
The Polk County Tax Office phone number is 936-327-6801. You will be calling them once you have the forms prepared to get the rest of the fees due – you will not be able to complete the numbers without talking to them. You need all the items below, before calling. Plus, have your VIN number handy. When talking with them, verify that you have everything required. If you have something wrong with your applications they generally will NOT call you or email you, even if you have provided that information. They will send you a written request, which may take some time to reach you.
Also, you have thirty days to get your application in from the date on the Bill of Sale and title. They enforce this to the day – if you are beyond the thirty days you will have to pay the penalty fee. You might as well enclose it with your original paperwork, or you will be doing it later. You can protest it, and some people have been successful in doing so. But you have to go to/phone the state offices to do that. Polk cannot/will not waive the late fee.
You may also get a temporary registration from the Tax Office. You can get transport tags INTO Texas from out of state or for within TX on the DMV website. In most cases these can be done electronically, printed and used.
Items you need:
- If “out of state” you may file for an inspection exemption. If in-state you must get the truck inspected before application.
- You will need a weight ticket.
- If registering by mail, then a copy of your drivers license (and spouses license if both are on the title) and proof of insurance must be submitted with the paperwork.
- Pictures of the items required for conversion to a motorhome. Refrigerator, sleeping facilities, cooking facilities, toilet, shore power, separate heating/cooling. If you have an APU then a picture of that. Not all of these items are required, and it is turning out that it is somewhat random what they actually want. In October 2017 they specifically asked me about shore power, for example.
- Pictures of all four sides of the truck. The full truck must be in the picture.
- New: you MUST have “Private RV Not For Hire” on both sides of the truck and you must supply a picture of that. Individual pictures are required, NOT just the side pictures of the truck. Don’t ask me why.
- A Bill of Sale, listing EVERY person on the Seller’s title, and EVERY person on the requested new (Buyer’s) title. If you leave one name off, you will have to re-do it. Dealer paperwork will suffice for this.
- The Title from the Buyer. EVERY named person on the title must sign the release. If it is a dealer you bought from they will/should do this correctly, but private buyers may not. Make SURE the signatures and printed names match the title. If they do not, you will have a problem.
Forms to fill out:
- VTR-272-B Vin Self Certification
- VTR-249 Abbreviations for Make and Body Style
- VTR-130-U Application For Title
- VTR-130-UIF Instructions for Application For Title
- VTR-61 Rebuilt Vehicle Statement
- VTR-35-A Personalized Plate
- VTR-122 Rights of Survivorship (if needed)
- VTR-144 Travel Trailer Verification (if also doing your trailer)
- Vehicle Safety Inspection Waiver, Self Certification. As far as I know Polk does not have their own form, I used THIS ONE and modified it to eliminate Harris County. If you know of a State form let me know. The online registration system for renewals allows self certification but I know of no paper form.
The latest versions of these forms can be found on the TX DMV Forms website HERE (http://www.txdmv.gov/forms). I’m not including direct links here, since these forms get updated over time, and you will want the latest version(s).
You can certify the Rebuilt Vehicle yourself – you do not have to have a builder do it. If you are doing this out of state you will be requesting a waiver of the Inspection. Put a note with the Rebuilt form that you are out of state and are requesting waiver of the inspection on the Rebuilt Form.
You do not need a VTR-64, which is the Assembled Vehicle Safety Inspection. Do not include any info on the second page of the VTR-61 form – this should be marked as Not Applicable. Unless you did re-engine or otherwise heavily modify your vehicle (not typical).
Trailers in TX are a strange thing. Technically, the large 5er’s that we use with our HDT’s should be categorized as semi-trailers according to the legal description. That is NOT how it is done. They are done as travel trailers. Yes, travel trailers. Note that on the form a travel trailer has size restrictions. You may fall outside of the width and length. The advice I have received – and others have received – is to simply put down 40’ long and 96” wide, even if you are larger. You can pursue this on your own if you like, but that is what people have been doing for years with larger trailers that fall outside the regulations as currently written.
The information above was accurate when written. Make SURE you verify current rules and regulations. The above should be viewed as guidance, only.
Truck Conversion Overview
By Jack Mayer
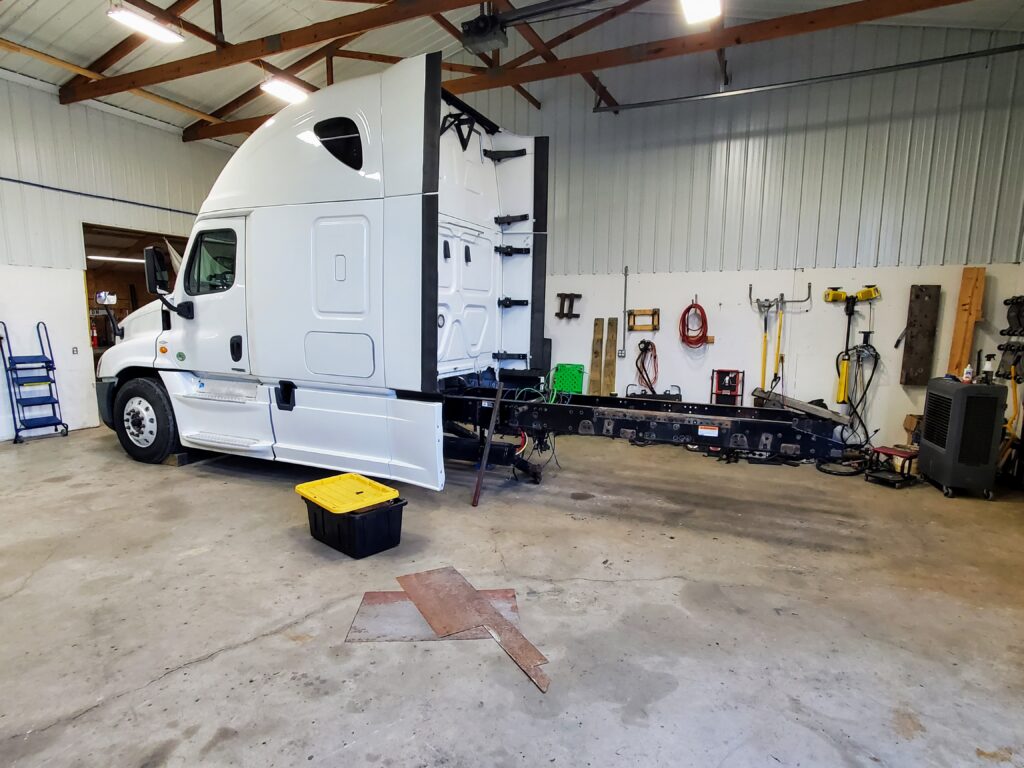
This article assumes starting with a tandem truck just off commercial service. It describes the items that we commonly do to “convert” the truck to RV use. While these are things that we commonly do, you can do more or less during a conversion project. The components specified are our recommendations, but other equivalent components are available in most cases. We specify these because we feel they are “best in class”, and are what we use personally.
While you “can” hook up an RV to a commercial truck, the lighting will not work, there will be no brakes, and the commercial hitch will beat the RV up pretty well, in most cases. Some people do run commercial hitches with RVs but we recommend removing the commercial hitch if it is not required for your mission profile – and replacing it with an RV suspension hitch behind the axles.
RVH Lifestyles provides a wide variety of services and products for the recreational HDT community. This article focusses on conversion topics.
The following is our view of the minimum required to convert a commercial truck for RV use:
- Remove commercial hitch
- Add fenders to the wheels to protect the front of the RV. Note this is not necessary if putting on a body.
- Add Direclink brake controller with an appropriate HD module.
- Add TST TPMS (tire monitor) system to the truck, with 6-10 sensors (depending on if you stay tandem). We use the Color display mounted overhead in the storage area. Extra sensors can be supplied for the trailer.
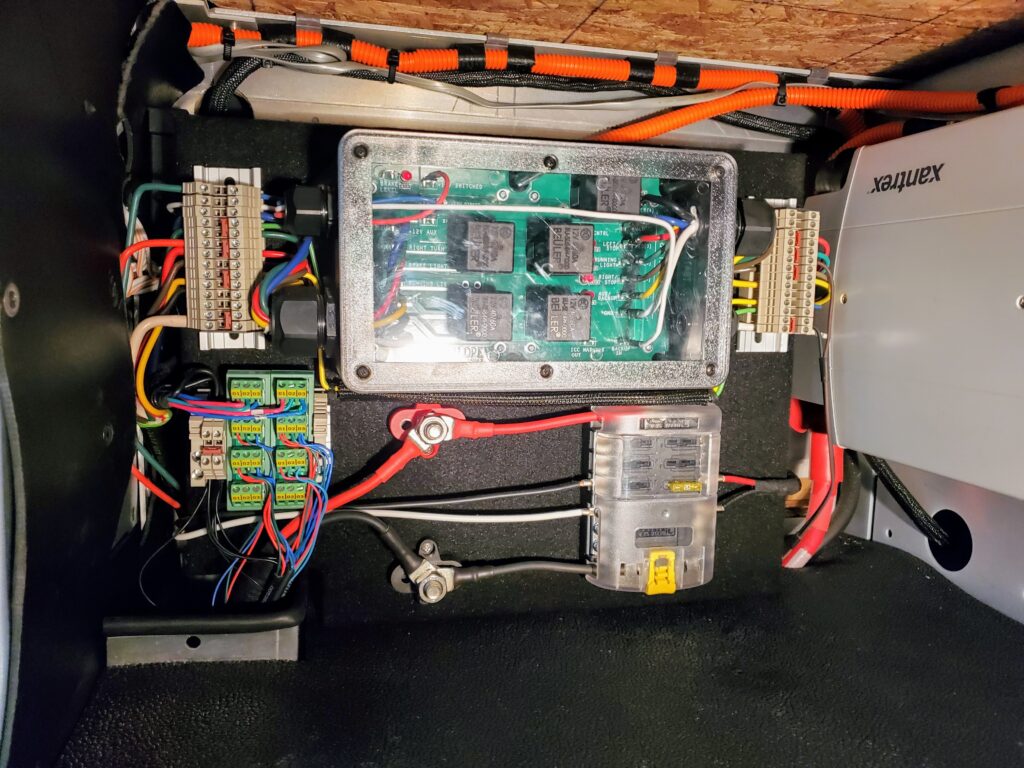
- Add the RVH Electrical center (includes Jackalope). This provides for RV light conversion and the future use of electrical accessories. It includes a DC load center with fuses, and terminal strips to pick up lighting signals. It comes with the seven-way trailer wire to reach the back of your truck, and a 7-way connector to plug your trailer into. It also comes with enough #6 wire to connect directly to your battery bank to supply the 12-volt load center, and a circuit breaker for that line. So basically everything you need to properly hook up your trailer and to support future expansion needs.
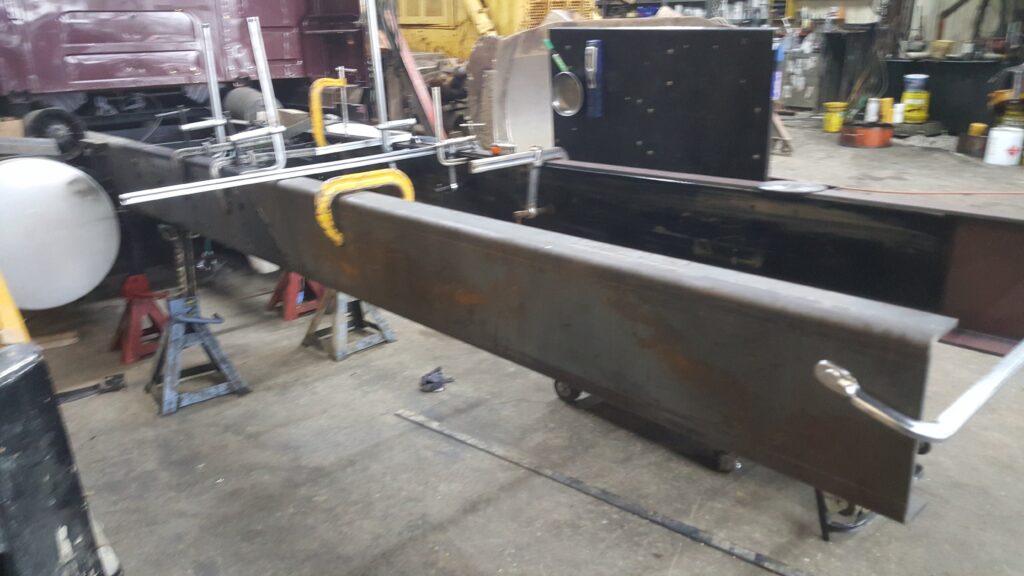
- Add an ET hitch rated for (typically) 5K-8K pin weight. On a tandem truck, this requires some frame extension – about 2’. The ET sold by RVH Lifestyles has the new upward dampeners in it, the new longer release arm, and the specialized ET head in place of a Binkley head. The ET head is serviceable and heavy-duty – the Binkley head is not serviceable. The ET is upgradeable to (up to) a 10,000 pin weight version if required in the future.
- At least one backup camera at the hitch and a 9” monitor at the dash. The monitor is surface mounted. A DVR system that records 6, 9 or 17 channels or a quad-view camera system is an option that can replace the simple display. Also, evaluate providing a video hookup at the rear of the bed to support three trailer cameras.
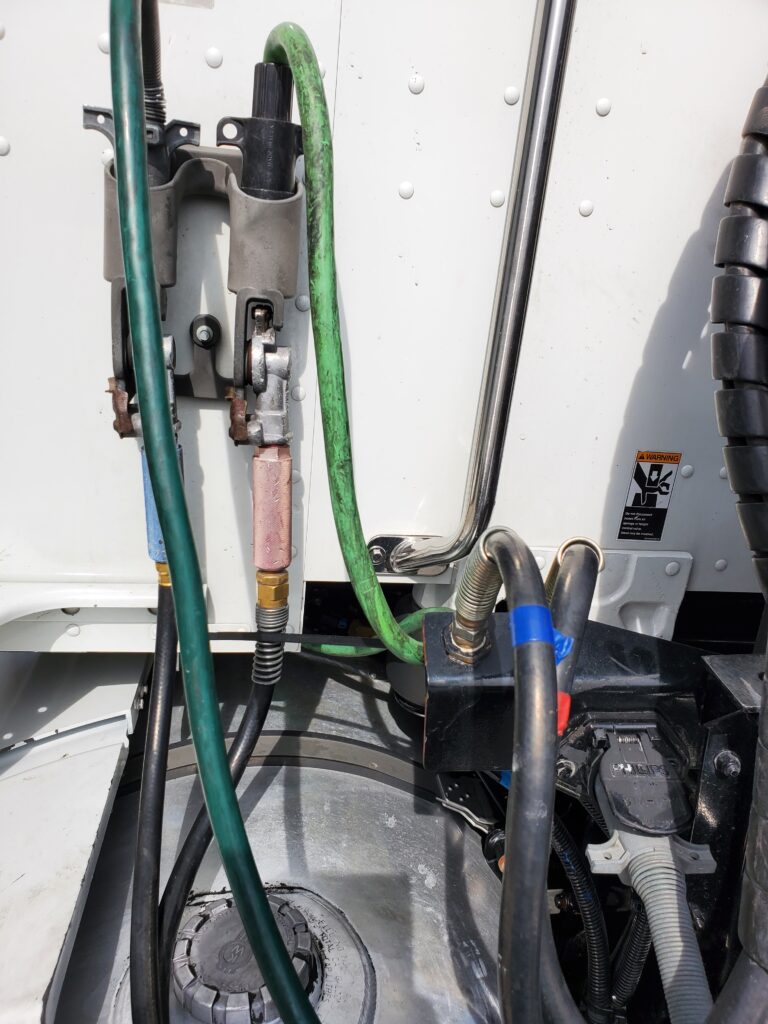
- Wire a 7-way RV blade socket at the rear of the truck for towing an RV trailer. This requires the RVH Electrical Center or the equivalent function. In the picture below you see (on the left) a typical 7-way connector for RV lighting, and below that, a smaller connector for video feeds from the trailer to the Quad monitor or to the DVR system. Three cameras on the trailer can be passed to the truck video system (without sound). Note, the gladhands on the right side are options for air systems, or for easily filling tires.
Other Common Changes
If you have hydraulic disc brakes on your trailer we can upgrade your trailer brake system to BluDot so that it operates off your truck air system – just like a “regular” semi-trailer. This gives you “best in class” braking for your RV. If you do this a brake controller for electric brakes is not required in the truck, although you might want it to be compatible with a “standard” RV.
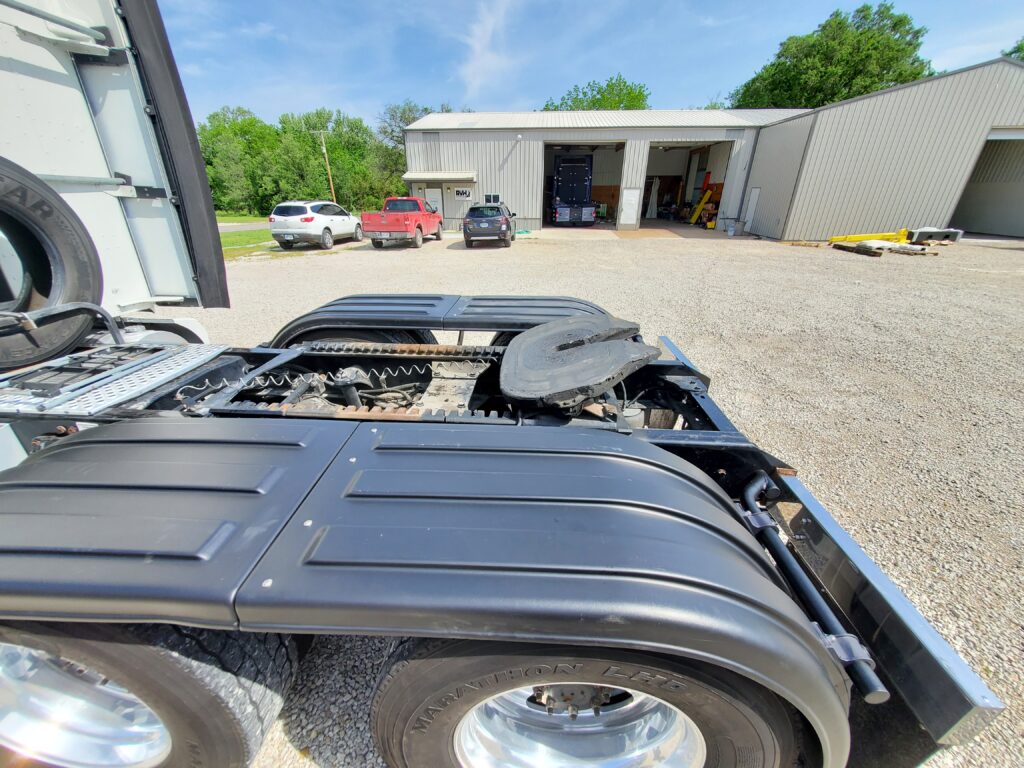
The other thing we do to almost every truck we convert is to change the vertical exhaust stack to a weed burner (horizontal) exhaust. This frees up space for the drom box and allows for additional storage. It also keeps exhaust off the trailer – although with full pollution trucks (trucks with DPF and DEF) exhaust soot is not really a factor). The cost of the weed burner conversion is typically under $1000 and allows for use of a drom box between the cab fairings.
Singling
We generally convert most trucks to single axle from tandem axles. Singling is mostly a personal preference, however, it adds significant cargo space to the bed design, and simplifies ongoing maintenance quite a bit. It also improves maneuvering if done correctly. If carrying any deck cargo heavier than a smart car, we recommend staying as a tandem, since you would likely be pushing the carrying capacity of the rear (single) axle – which is usually rated in the 19,500 lb area. While you could find a 23K-rated rear axle for a singled truck, it is rare to do an axle swap. However, we can do that work if desired.
Singling involves removing the forward-most rear axle and relocating the rearward one. There are three positions commonly used to relocate the axle. “Short” which is to place the axle in the forward position where the “removed” axle was. “Long” which is to leave the rearward axle in its original location. And “Mid”, which locates the axle someplace in between the two original locations.

Generally, we recommend the “mid” (middle) solution, since it balances the looks of most trucks better, and allows for a deck that can carry cargo without excessive cantilever of the hitch. This does require drilling new hanger holes, which the other options do not. So it adds to the work and cost (somewhat). But in the end, you get a better solution.
You can read more about singling – and the tradeoffs involved in the Singling Article.
Additional items like various bed designs, APUs, lighting, trim/chrome, seating revisions, etc are upgrades to “make your truck your own”, and to provide additional comfort and capabilities are things many people want to do. But none are “required” to convert to RV use.
If it can be done to an HDT, we can do the work – from mechanical to appearance items, we do most of the things that make the truck an exceptional recreational hauler.